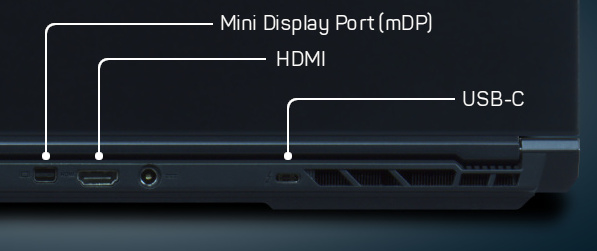
The M1 and M2 models can drive 4 total displays: 3 external 4K panels and the laptop panel. The Ir14 and Ir16 can drive 3 total displays: the laptop panel and 2 x 4k, although a 4th might be daisy-chained. The NX models can drive up to 4 external 4K displays. The discontinued XE model (replaced by the Ir-series) can drive 3 total displays: 2 external 4K panels and the laptop panel, although a 4th might be daisy-chained.
Please read the disclaimer before proceeding. We review and update guided solutions regularly. If you have suggestions or requests, please write support@kfocus.org.
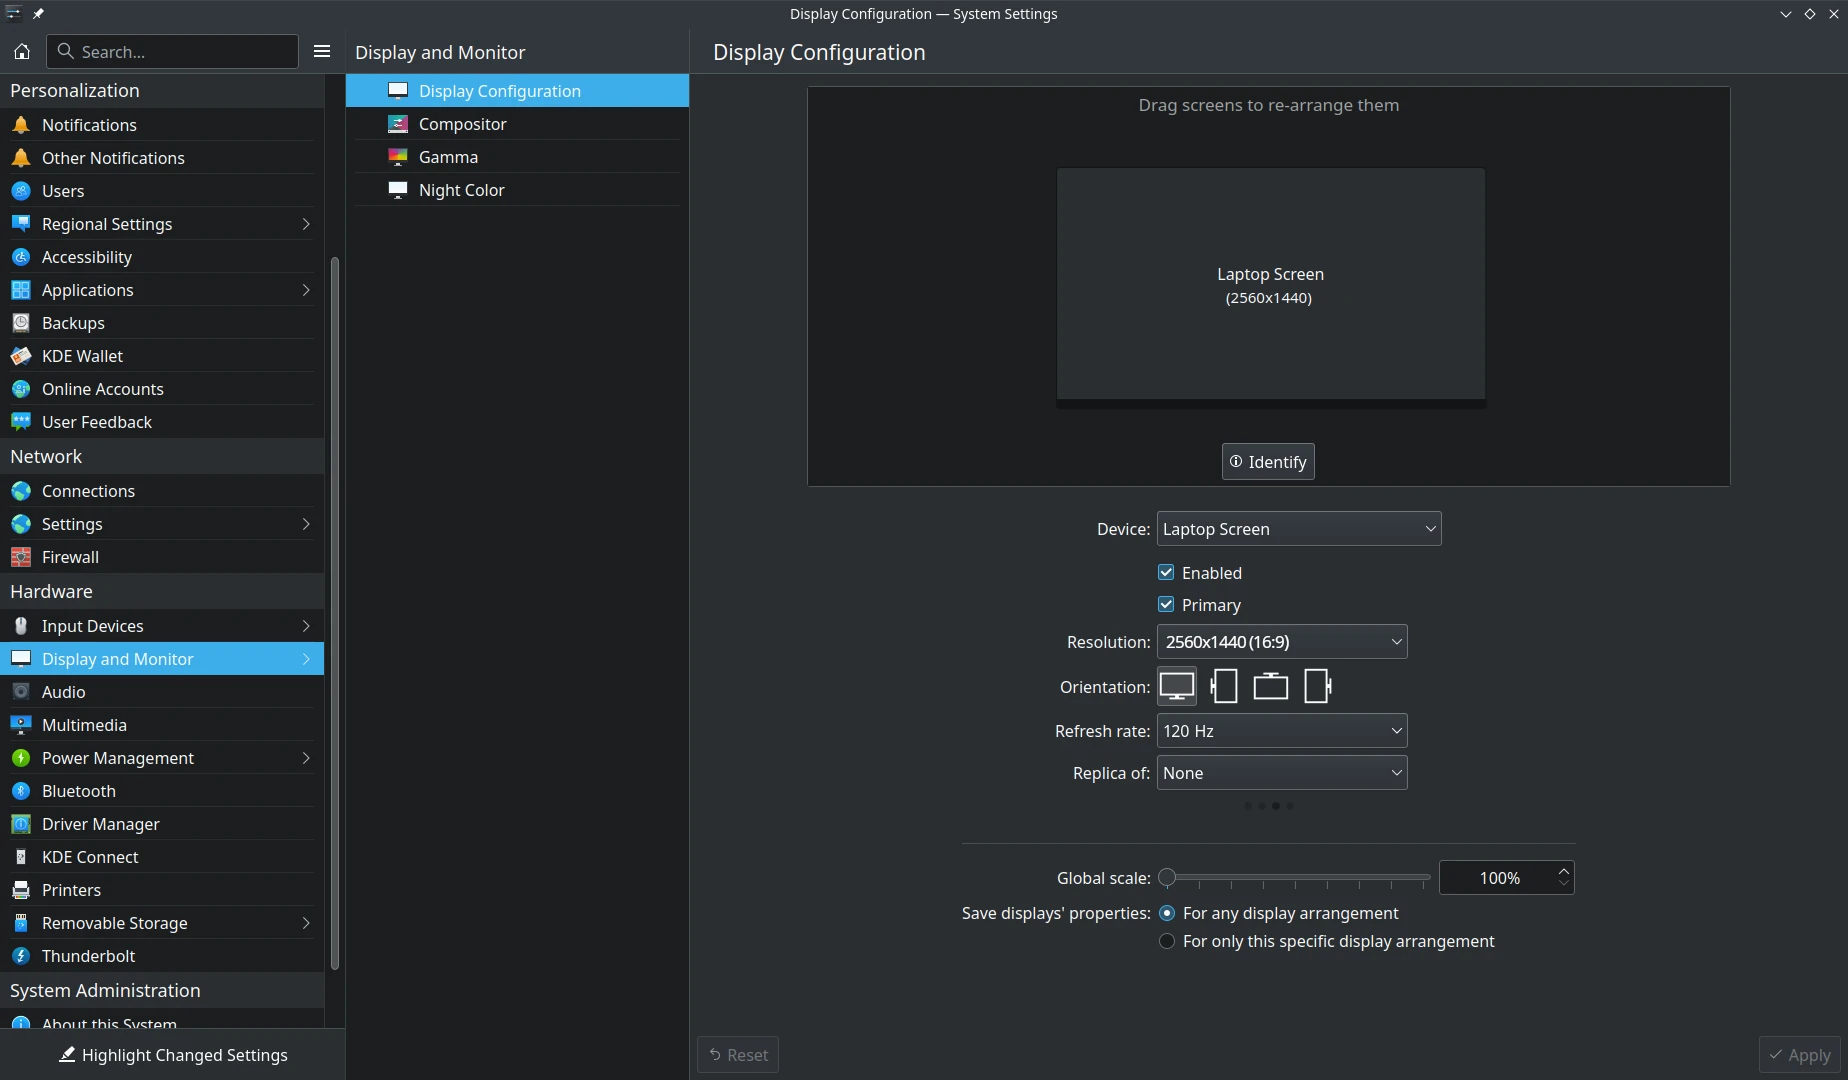
Open system settings and then click Displays
. The interface will appear as shown when no external displays are attached. Use this as your preferred interface for setting your display configuration. This overlaps with the Nvidia tool which is discussed next.
WE DO NOT RECOMMEND USING NVIDIA SETTINGS for most display configurations. There are a few reasons for this. First, it is unavailable unless you have an Nvidia GPU. Second, many common features are available in easier-to-use interfaces, such as the display section of system-settings (above), or the Kubuntu Focus Video Sync Utility. Finally, and perhaps most importantly, it encourages one to write an xorg.conf
file, which can break hot-plugging of displays. However, there are some useful advanced settings that are not available elsewhere. We just recommend that you decline to write that xorg.conf
file when asked!
The M1 and M2 models can easily drive up to four displays with the discrete RTX GPU: the laptop QHD or 1080p LCD, and three external panels using mDP, USB-C, HDMI, and Thunderbolt. All external displays can be at least 4K resolution.
The XE models can drive up to four displays with the integrated Iris Xe GPU: the laptop 1080p LCD, and three external panels using HDMI and Thunderbolt. All external displays can be at least 4K resolution. One must use Thunderbolt Daisy Chaining to attach the 4th display.
The NX models can drive up to four displays with the integrated Iris Xe GPU: all external panels using 2 x USB-C ports, HDMI, and mDP. As with the others, the Thunderbolt port may be daisy-chained to drive more than a single panel. All panels can be at least 4K resolution.
The Ir14 model can drive up to four displays with the integrated UHD GPU: external 4K displays, a 1080p display, and the laptop panel concurrently.
If your monitor does not have matching input, you can convert the signal. You may, for example, use a converter cable to attach a DisplayPort input on a display to the USB-C output on the system. However, it is best to avoid converter cables when you can. With any cable, check the rated capacity to ensure it can drive the display at the resolution you want. Also, remember that HDMI can transport high-quality audio, and this can be useful in certain situations.
USB-C and mDP outputs have the highest capacity and can drive monitors up to 8k @ 60 Hz, while the HDMI output can drive a monitor at 4K @ 60 Hz. Available options are determined by the output capabilities from the laptop and the capabilities of your monitors. If, for example, you attach a 1080p @60 Hz monitor, the highest resolution you may select will be 1920 x 1080.
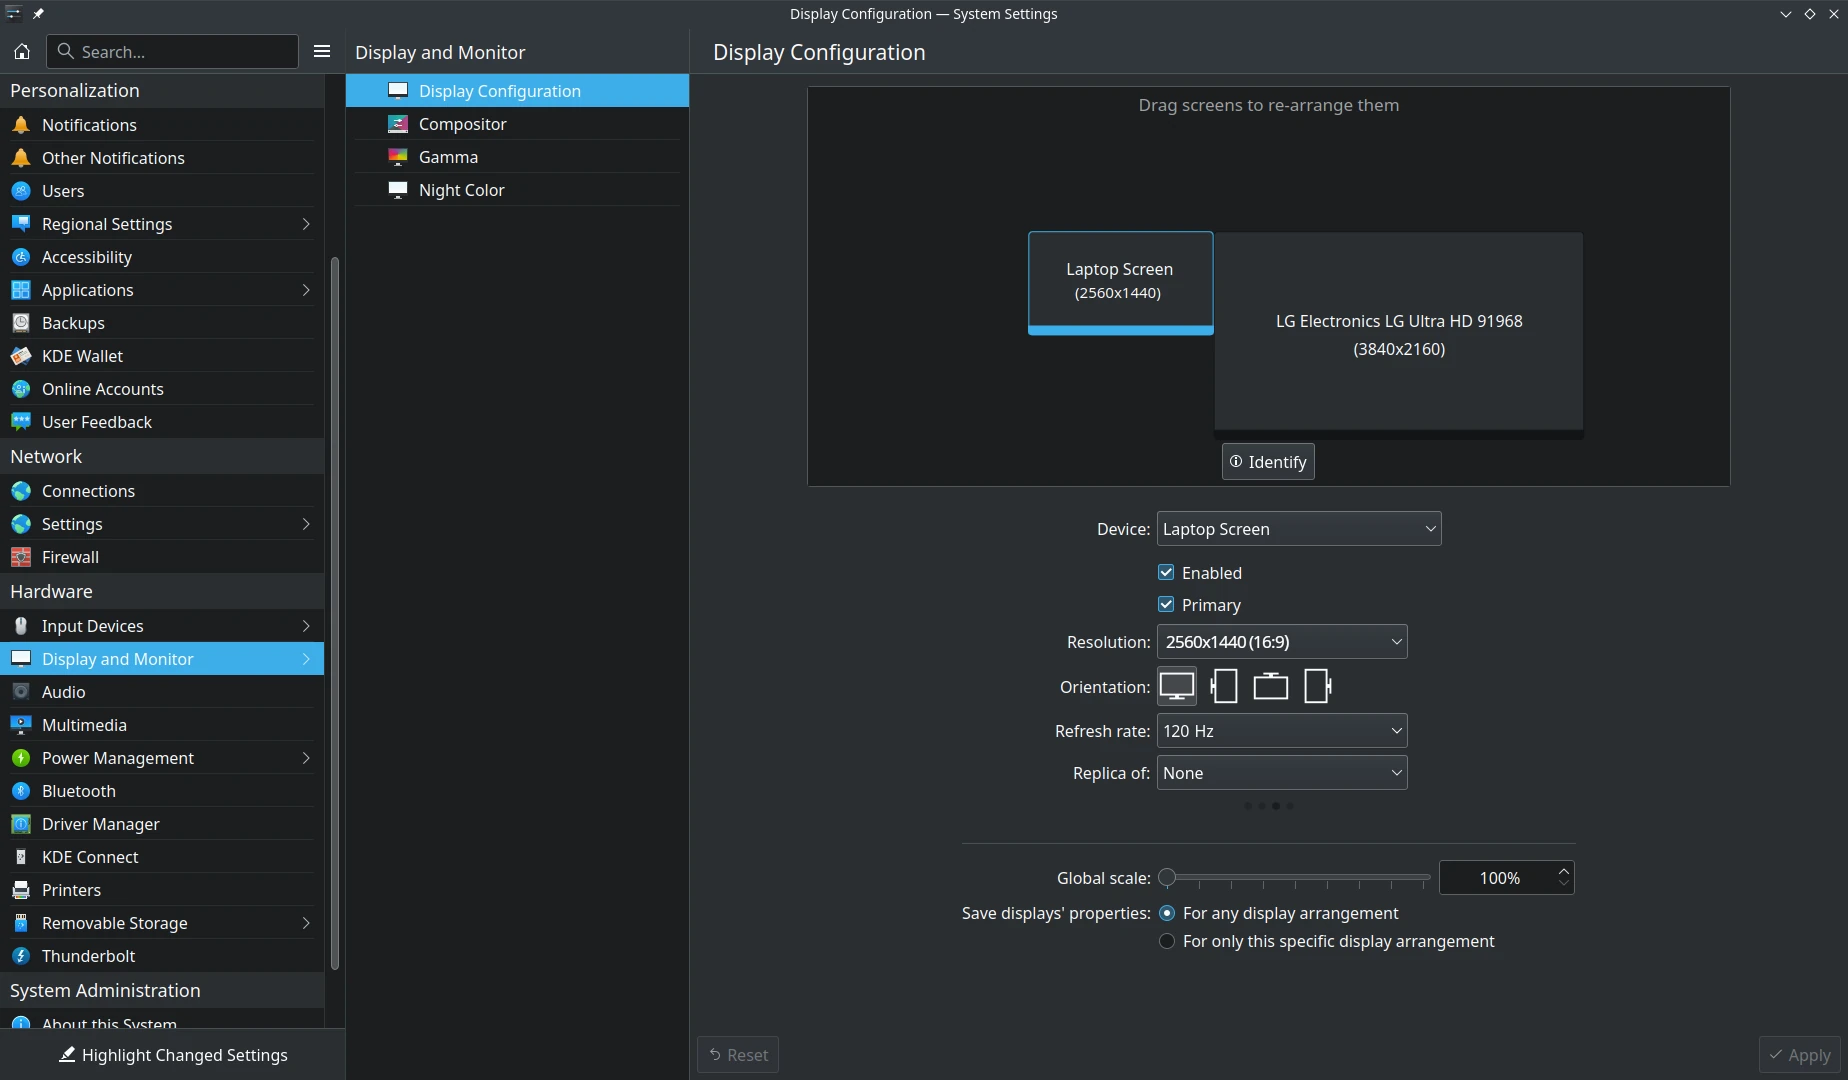
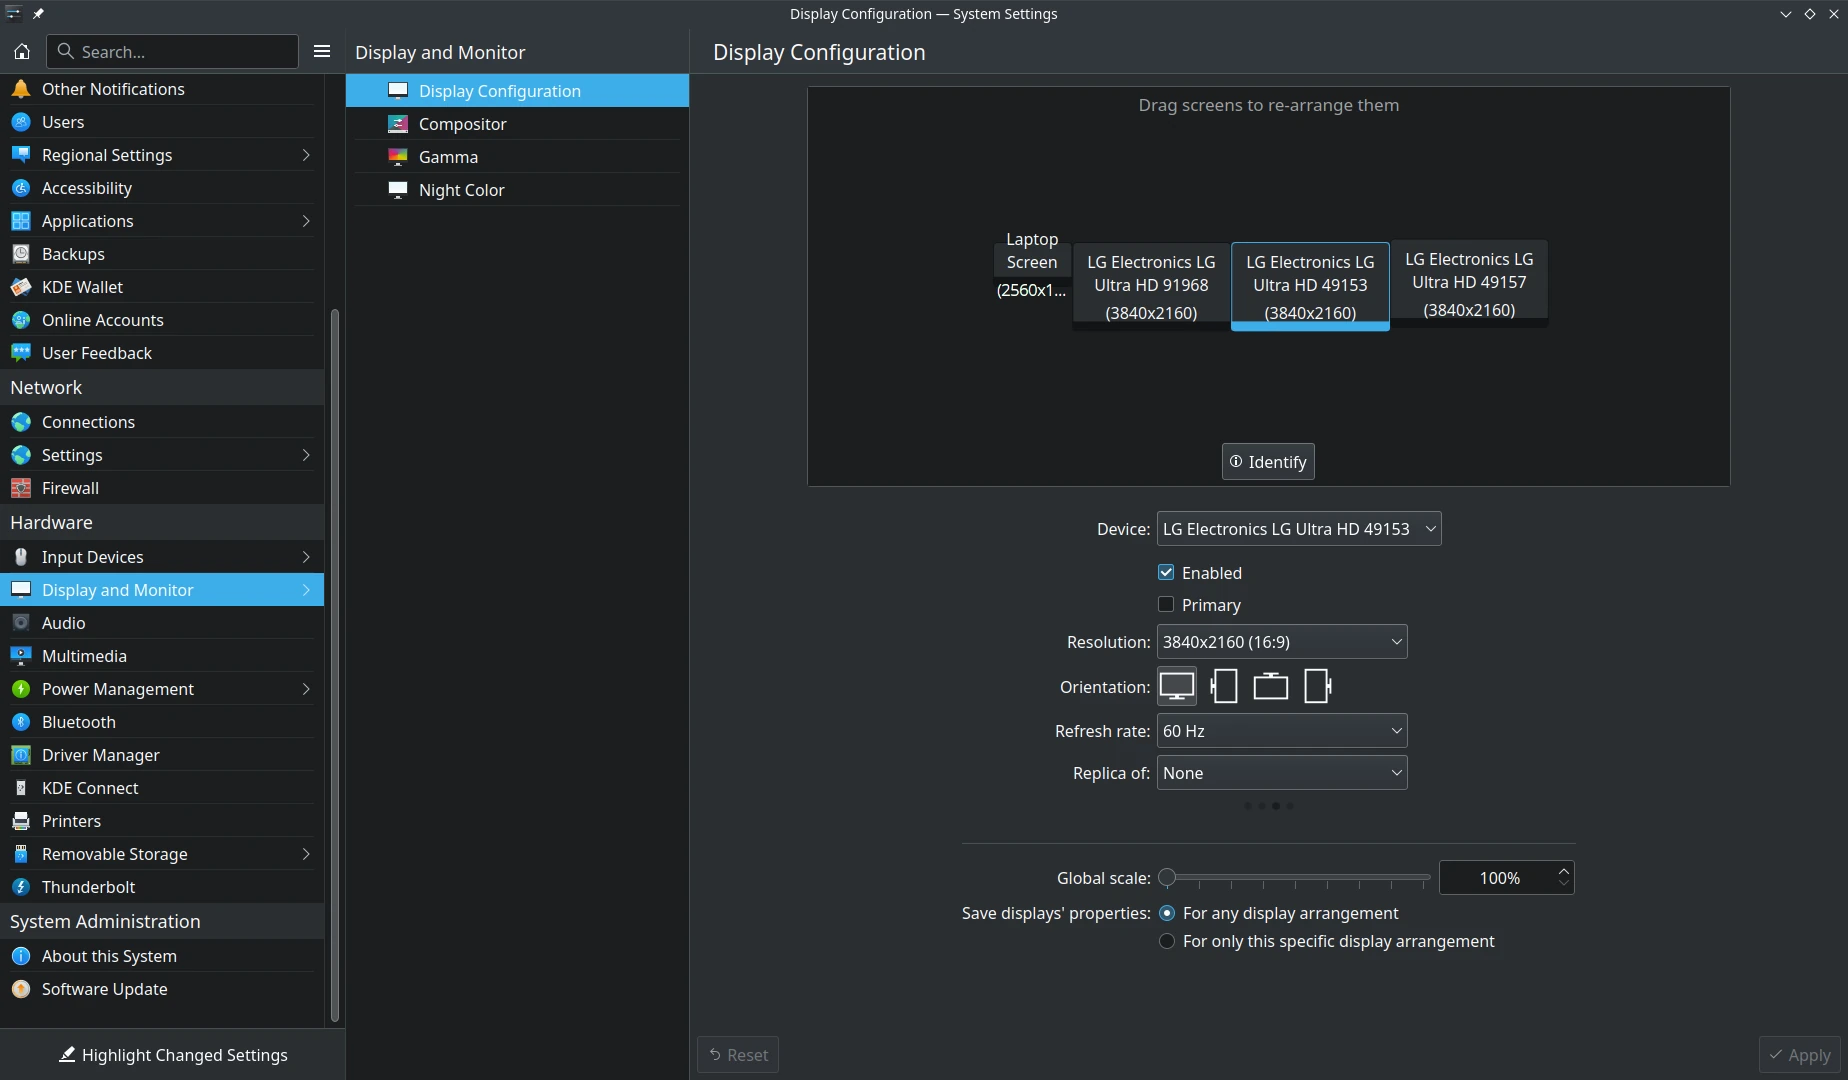
As you attach the cables, the displays will appear on-screen. You can also attach the cables without the settings window open. In this situation, you will be prompted to configure each monitor as you connect each cable.
Once all displays are added, you will want to move them to the desired location. We suggest placing the laptop to one side on a stand and aligning the displays to the bottom edge. Click on Identify
to ensure you have them in the proper order. Make sure all the displays are Enabled
and the laptop panel is set as the Primary
display. Then click Apply
.
Once you have the displays positioned, you should be able to sweep your cursor across all displays from left to right. Increase cursor speed as needed. If the cursor does NOT switch smoothly between screens, return to the display settings to adjust as needed.
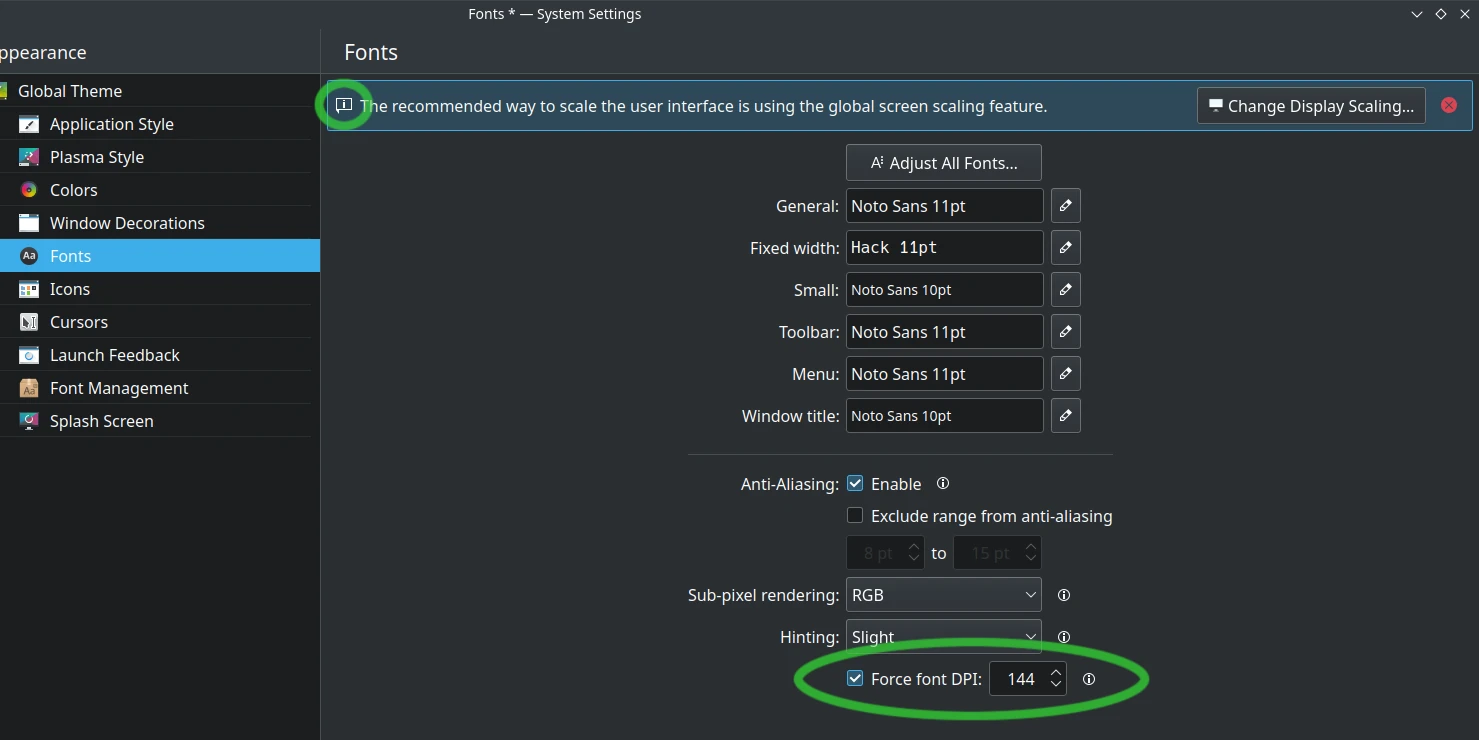
High-DPI (HiDPI) displays have substantially higher pixel density than 96 Dots Per Inch (DPI). Most desktop 4K monitors are HiDPI, as are QHD 15.6 or 17.3" laptop displays. This higher density can cause text or buttons to display smaller than desired. Although upcoming KDE versions work better with display scaling, we have found that setting the font DPI is more reliable for KDE 5.27 LTS.
Open System Settings > Fonts > Fonts
. Then set the font DPI; on a 28" 4K display, we have found 144 DPI to be a good choice. Then logout and back in, and you should see larger window titles, text, and other graphics.
Sometimes, GTK apps like Google Chrome or Meld refuse to follow the DPI settings. The following steps almost always fix this issue, and the changes remain even after logging out:
Google Chrome
or Meld
.konsole
.xsettingsd
and press return.[CTRL][C]
to exit the xsettingsd processAs of Q1 2024, we do not recommend using the QT Theme in Google Chrome. While the GTK theme looks nearly perfect, the Use QT
option doesn't look finished, with some mismatched colors and some context menus that are unreadable.white text on a white background in some context menus.
It is best to disable displays by visiting System Settings > Displays
interface. Unplugging a display has the same effect, but it takes longer. In either case, the system moves application windows to the remaining visible displays.
One may tile a window by "pushing" it into a screen edge. To change this behavior, click on System Settings > Workspace Behavior > Screen Edges
and adjust as desired. Remember, you can always click Defaults
to restore the default settings.
To move a window quickly, press the Meta key, then press-and-hold the left mouse button anywhere in the window. You can then drag the window wherever you want it. This is especially handy if the window is partially off-screen.
If you want to change the key used to trigger this behavior, click on the System Settings > Window Management > Window Behavior > Window Actions
tab and then select a different modifier key
as shown in the image. You can always click Defaults to restore the default settings.
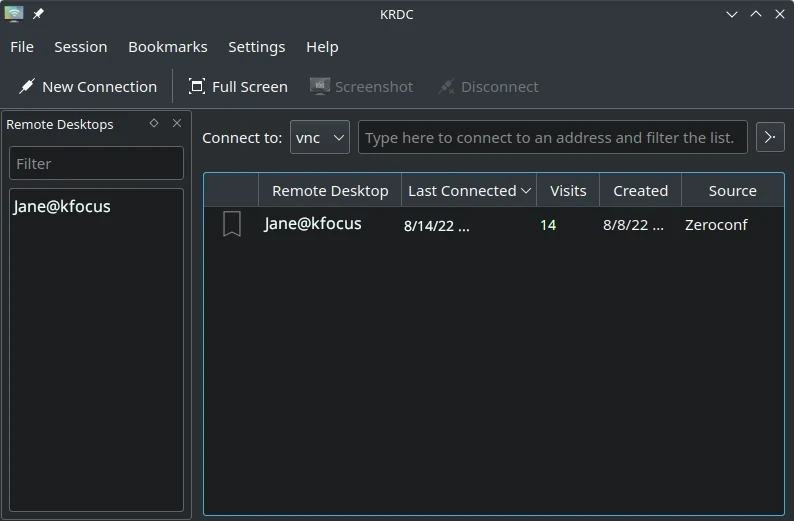
Virtual Network Computing can be done with the help of KRFB, and KRDC which is useful when working on the same network as many other machines.
A more in-depth article can be found on BinaryTides showing how to install and setup VNC.
This consideration ONLY applies to systems with Nvidia GPUs, like the M1 or M2. It does NOT apply to Intel-only systems like the XE, NX, or Ir14.
Focus systems offer to turn off Nvidia GPUs when using battery and Intel graphics. This extends the battery life significantly, and it is the preference of many users. When you do this, however, not all the external display ports remain available. The only way to restore these ports is to reboot the system.
When using Intel (Power-Save Mode)
and the M2 GEN 3+ models, one can add one additional display using USB-C. With the right equipment, you may be able to daisy chain addition displays. Otherwise, if you require the maximum number of external displays, please switch to Nvidia Performance mode. Other options include using Hybrid GPU (On-Demand Mode) which can reduce responsiveness, or adding a display dock.
Q: I would like to run multiple displays with the iGPU. Is this possible?
A: Yes. If you are using a system without a discrete GPU, any mDP, HDMI, or USB output should work. If you are using an M-series laptop and using the Intel iGPU, you may attach an addiitonal display through the USB-C port.
Q: When I plug in an external display everything slows down. What is the problem?
A: This can happen when you are using the Hybrid GPU (On-Demand Mode). This mode uses the Intel GPU to drive all displays, and has slow performance. As mentioned elsewhere, we recommend this mode only when you want to maximize VRAM for GPGPU purposes. But sometimes one can forget to switch back.
To fix this, visit the GPU widget in the system tray and select Switch to Nvidia GPU (Performance Mode)
. After rebooting, your desktop interface should run much more smoothly.
Q: When I booted, my external displays do not work. What could be happening?
A: There are two likely causes. First, you may be running Intel (Powersave mode)
. Switch to Nvidia (Performance mode)
and your displays should return (see M2 External Displays for more detail). If you are already running in Nvidia (Performance Mode)
and the displays are still not showing up, the DKMS modules may not be updated correctly. Please try running sudo dkms autoinstall
and follow the instructions. Install headers if you are requested. Once complete, reboot and the multi-display support should return.
Q: I was previously able to connect an external monitor. Now that same monitor is not recognized. What I can I do to fix this?
A: The file /lib/modprobe.d/nvidia-kms.conf
contains a setting for Nvidia GPUs. This can get changed during an driver update. You can edit it using sudo nano /lib/modprobe.d/nvidia-kms.conf
(you may use your preferred CLI text editor instead of nano
). Then ensure that modeset=0
is the final portion of the line as presented below.
If you changed the file, sign-out and then sign-in again to restart the X-server (although a reboot might be needed), after which your monitor should be recognized. Thanks to Matt K. for sharing his research.
This is a partial revision history. See the git
repository for all entries.
2024-07-02 c83184e4
Switch to kfocus-mime schema2024-06-05 b9bb6236
Wording improvements2024-03-18 fb9b592d
Add syntax highlighting for codeblocks2023-11-18 e770b1c6
Add search and help bar2023-07-09 33ece8e2
Add advice on GTK app scaling2023-06-19 a7af817b
Expand display settings section2023-06-19 a7af817b
Update dGPU schematic2023-04-25 19f0fa02
Revise Intel graphics, Ir14 sections2023-04-16 b2a98ac2
Fix minor grammar and spelling errors2023-04-16 1bc15058
Revise iGPU advice2023-03-16 189ca8ae
Adjust XE advice per Gen 22022-08-30 7db76c5e
Update main image to be more Jammy2022-08-08 89994f16
Add VNC setup details2022-07-19 3b5c2287
Update content for 22.042021-10-10 5728326e
Reformat to 2-column2021-09-22 dc862884
Update link and headline colors2021-09-14 93b1d395
Add Wavlink docking station details2021-08-23 681261b4
Review and update codeblocks2021-07-28 1b9cf29b
Revise units to have a space after number2021-04-29 d21d0881
Add hint to reset on-demand mode2021-03-04 6aad5dc8
Add specs for monitor support2020-10-31 9c3ef96d
First publicationWe try hard to provide a useful solution validated by professionals. However, we cannot anticipate every situation, and therefore cannot guarantee this procedure will work for your needs. Always backup your data and test the solution to determine the correct procedure for you.
THIS SOLUTION IS PROVIDED BY THE COPYRIGHT HOLDERS AND CONTRIBUTORS “AS IS” AND ANY EXPRESS OR IMPLIED WARRANTIES, INCLUDING, BUT NOT LIMITED TO, THE IMPLIED WARRANTIES OF MERCHANTABILITY AND FITNESS FOR A PARTICULAR PURPOSE ARE DISCLAIMED. IN NO EVENT SHALL THE COPYRIGHT OWNER OR CONTRIBUTORS BE LIABLE FOR ANY DIRECT, INDIRECT, INCIDENTAL, SPECIAL EXEMPLARY, OR CONSEQUENTIAL DAMAGES (INCLUDING, BUT NOT LIMITED TO, PROCUREMENT OF SUBSTITUTE GOODS OR SERVICES; LOSS OF USE, DATA, OR PROFITS; OR BUSINESS INTERRUPTION) HOWEVER CAUSED AND ON ANY THEORY OF LIABILITY, WHETHER IN CONTRACT, STRICT LIABILITY, OR TORT (INCLUDING NEGLIGENCE OR OTHERWISE) ARISING IN ANY WAY OUT OF THE USE OF THIS SOLUTION, EVEN IF ADVISED OF THE POSSIBILITY OF SUCH DAMAGE.
HAVE QUESTIONS?Call 844-536-2871 or write
TellMeMore@kfocus.org | GET FOCUS MERCH