Audio Controls

Playback & Record Sound

This article shows how playback and record sound using basic audio controls, System Settings, and PulseAudio Volume Control. Some options shown below may not be available for all systems. For example, you must have a display attached to use HDMI sound. Also, not all desktop systems include built-in speakers or microphones.

Configure sound with audio controls.

Configure sound with audio controls.

Please read the disclaimer before proceeding. We review and update guided solutions regularly. If you have suggestions or requests, please write support@kfocus.org.

Basic Audio Controls

You can quickly access basic audio controls in the system tray as shown below. This is sufficient for most playback and recording needs.

Open System Settings from the panel menu.

If you require more flexibility, click on the Settings icon, which is circled in green in the prior image. This will open System Settings > Audio, where you can adjust volume, microphones, and notification sounds. Click on [ Configure Volume Controls… ] in the bottom right corner for more options.

Open System Settings > Audio.

PulseAudio Volume Control provides the greatest ability to change devices, routing, and volumes. To launch PulseAudio, press [ALT][SPACE] to show the Krunner search box at the top of the screen, then type “PulseAudio”, and click on the title card for the app.

Open PulseAudio from Krunner.

Play Sound with Speakers

1. Play audio with the desired app. You may, for example, play a long video in a browser or a video player app.

2. Open PulseAudio and click the [ Configuration ] tab. Check the box next to Built-In Audio to activate it. Then click on the Profile drop-down menu and select [ Analog Stereo Duplex ].

Set Configuration Profile to Analog Stereo Duplex.

3. Click the [ Output Devices ] tab. Click the Port drop-down menu and select [ Speakers ]. In this section, drag the volume control slider to set the overall Speakers volume. Make sure this output is not muted by clicking on “Mute audio” toggle button at the top-right corner. You may need to click the adjacent “TV” icon to “Set as fallback” so the sound is routed to this output.

Ensure output device is Speakers.

4. Click the [ Playback ] tab to verify the output meter for the app pulsates as the sound is playing. You can change the volume relative to other apps using the volume control slider; otherwise, we suggest you leave it at 100%.

Check that playback is active.

Play Sound with Headphones

1. Play audio with the desired app. You may, for example, play a long video in a browser or a video player app.

2. Open PulseAudio and click the [ Configuration ] tab. Check the box next to headphones profile to activate it. Then click on the Profile drop-down menu and select [ Analog Stereo Output + Mono Input ] or similar. Uncheck the other boxes to disable other profiles.

Deactivate profiles other than headphones.

3. Click the [ Output Devices ] tab. Click the Port drop-down menu and select [ Headphones ]. In this section, drag the volume control slider to set the overall Headphones volume. Make sure this output is not muted by clicking on “Mute audio” toggle button at the top-right corner. You may need to click the adjacent “TV” icon to “Set as fallback” so the sound is routed to this output.

Ensure output device is Headphones.

4. Click the [ Playback ] tab to verify the output meter for the app pulsates as the sound is playing. You can change the volume relative to other apps using the volume control slider; otherwise, we suggest you leave it at 100%.

Check that playback is active.

Play Sound from a Display

1. Play audio with the desired app. You may, for example, play a long video in a browser or a video player app.

2. Attach an external display with an HDMI, DisplayPort, or USB-C cable.

3. Open PulseAudio and click the [ Configuration ] tab. Check the box next to the graphic card profile to activate it. Then click on the Profile drop-down menu and select [ Digital Stereo (HDMI) Output ] or similar. IMPORTANT: if you have multiple displays attached, you must select the correct profile for that display. Uncheck the other boxes to disable other profiles.

Deactivate Analog Stereo Duplex in Configuration.

4. Click the [ Output Devices ] tab. Click the Port drop-down menu and select [ HDMI/DisplayPort (plugged in) ]. In this section, drag the volume control slider to set the overall volume for this output. Make sure it is not muted by clicking on “Mute audio” toggle button at the top-right corner. You may need to click the adjacent “TV” icon to “Set as fallback” so the sound is routed to this output.

Ensure that output device is HDMI.

4. Click the [ Playback ] tab to verify the output meter for the app pulsates as the sound is playing. You can change the volume relative to other apps using the volume control slider; otherwise, we suggest you leave it at 100%.

Check that playback is active.

Record Sound with Internal Mic

1. Open an app to test recording audio, like Audacity. You can click the record button to test sound capture.

2. Open PulseAudio and click the [ Configuration ] tab. Check the box next to Built-In Audio to activate it. Then click on the Profile drop-down menu and select [ Analog Stereo Duplex ]. Uncheck the other boxes to disable other profiles.

Set Configuration Profile to Analog Stereo Duplex.

3. Click the [ Input Devices ] tab. Click the Port drop-down menu and select [ Internal Microphone ]. In this section, drag the recording level slider to set the overall level for this input. Make sure it is not muted by clicking on “Mute audio” toggle button at the top-right corner. You may need to click the adjacent “TV” icon to “Set as fallback” so the mic is routed from this output. The recording meter should move as you make sound.

Check that Internal Microphone is unmuted and active.

4. Click the [ Recording ] tab, then click on the profile next to “From“ and select [ Internal Microphone ]. Verify the recording meter for the app pulsates as you make sound. Then record sound in the app you opened above. You can change the recording level relative to other apps using the recording level slider; otherwise, we suggest you leave it at 100%.

Ensure the Recording Device is Built-In.

Record Sound with External Mic

1. Attach an external analog or USB mic to your system. In this example, we attached an AT2020 USB microphone.

2. Open an app to test recording audio, like Audacity. You can click the record button to test sound capture.

3. Open PulseAudio and click the [ Configuration ] tab. Check the box next to the mic name to activate it. Then click on the Profile drop-down menu and select [ Analog Stereo Duplex ].

Set Configuration Profile to external microphone.

4. Click the [ Input Devices ] tab. Mute the internal microphone by clicking the “Mute audio” toggle button at the top-right corner. In the external microphone profile, click the TV icon to set it as fallback. Its recording meter should move as you make sound. Drag the recording level slider to set the overall level for this input.

Set microphone as fallback and mute Internal Microphone.

4. Click the [ Recording ] tab, then click on the profile next to “From“ and select [ AT2020 USB Analog Stereo ] or similar for your mic. Verify the recording meter for the app pulsates as you make sound. Then record sound in the app you opened above. You can change the volume relative to other apps using the volume control slider; otherwise, we suggest you leave it at 100%.

Ensure the recording device is set to the microphone's profile.

Bluetooth

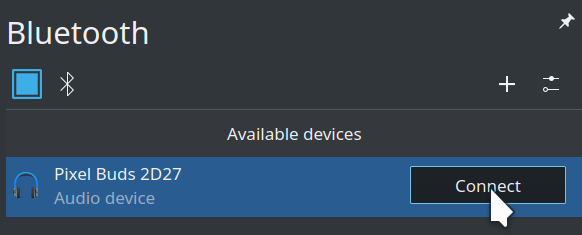
Setting up Bluetooth audio is similar to above. See the Bluetooth Guided Solution for more details.

Bluetooth Headphones

Troubleshooting

Q: I can't hear anything from my browser. All other apps play sound. How can I fix this?

A: The browser app may be muted. In this case, right click on the app icon in the panel and uncheck the [ ] Mute option. The volume for the browser app may also be set too low. You can check this by clicking on the speaker icon in the system tray, then click on the [ Applications ] tab and make sure the app volume is 100%. Finally, some browsers allow you to mute an individual tab. See your browser instructions for exact details, but usually this requires right-clicking on the tab to select an Unmute Site option or something similar.

Revisions

This is a partial revision history. See the git repository for all entries.

Disclaimer

We try hard to provide a useful solution validated by professionals. However, we cannot anticipate every situation, and therefore cannot guarantee this procedure will work for your needs. Always backup your data and test the solution to determine the correct procedure for you.

THIS SOLUTION IS PROVIDED BY THE COPYRIGHT HOLDERS AND CONTRIBUTORS “AS IS” AND ANY EXPRESS OR IMPLIED WARRANTIES, INCLUDING, BUT NOT LIMITED TO, THE IMPLIED WARRANTIES OF MERCHANTABILITY AND FITNESS FOR A PARTICULAR PURPOSE ARE DISCLAIMED. IN NO EVENT SHALL THE COPYRIGHT OWNER OR CONTRIBUTORS BE LIABLE FOR ANY DIRECT, INDIRECT, INCIDENTAL, SPECIAL EXEMPLARY, OR CONSEQUENTIAL DAMAGES (INCLUDING, BUT NOT LIMITED TO, PROCUREMENT OF SUBSTITUTE GOODS OR SERVICES; LOSS OF USE, DATA, OR PROFITS; OR BUSINESS INTERRUPTION) HOWEVER CAUSED AND ON ANY THEORY OF LIABILITY, WHETHER IN CONTRACT, STRICT LIABILITY, OR TORT (INCLUDING NEGLIGENCE OR OTHERWISE) ARISING IN ANY WAY OUT OF THE USE OF THIS SOLUTION, EVEN IF ADVISED OF THE POSSIBILITY OF SUCH DAMAGE.

HAVE QUESTIONS?Call 844-536-2871 or write
TellMeMore@kfocus.org   |  GET FOCUS MERCH